
I made some cereal box folders today. This time, instead of just explaining what I did with just pictures of the final product, I took pictures all along the way. (And by that I mean Braeden took pictures for me all along the way: what a good husband he is.) Also, due to popular demand, this time the printed side of the boxes is face out, with the unprinted side face in. You can easily switch this by just reversing the folds shown here so you can have blank outsides and a party inside: you decide.
 1. The very least amount of materials you need are a cereal box, a pair of scissors, and one sheet of the paper the size you are making the folder for (I used 8.5x11.) Optional additional tools are a bone folder, ruler, exacto knife and self-healing mat.
 2. Set your paper on top of your box to make sure it will fit. You want it to sit between the top flaps of the box and overhang the side panel between an inch or two. Not all cereal boxes are big enough, so make sure you check your sizing first!
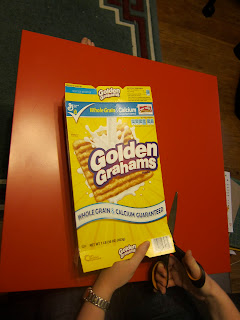 3. Start by cutting up the side seam of the box that is to the right of the panel you want to be the front cover of your folder. Try to keep your cut as straight as possible.
 4. Flatten your box out.
 5. Cut off the side flaps of all the panels except for the ones attached to the back cover of your folder.
 6. Angle the remaining side flaps for less bulk in the corners.
 7. Your box should look like the one above.
 8. Fold the side panel in half to make the top fold. You can either line up the seams as shown above, or you can measure it out with a ruler, score with a bone folder, then fold. Just make sure that whatever method you choose you leave enough space for your paper to fit inside your folder.
 9. Fold down your remaining 3 flaps. Use your fingernails to make your creases strong. A bone folder is also helpful here if you have one.
 10. If the cut along the fore edge of your folder is a little wobbly, you can use an exacto and straight edge to trim it up.
 11. There you go! You made a folder!
 12. You can see paperclips here holding the flaps together. You can use these at first to keep your flaps down, but in time they will stay by themselves and the paper clips will no longer be necessary.
 13. You can also make a stack of your folders and, using trimmed off flaps to protect them, affix binder clips to help the boxes adapt to their new shape.
If you have any questions feel free to leave a comment and I'd be happy to clear up any confusion.
Happy folder making!


If you have any questions feel free to leave a comment and I'd be happy to clear up any confusion.
Happy folder making!
No comments:
Post a Comment